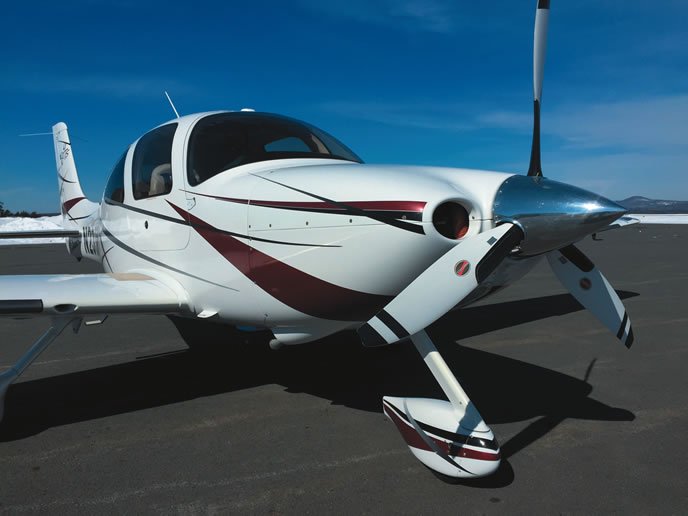
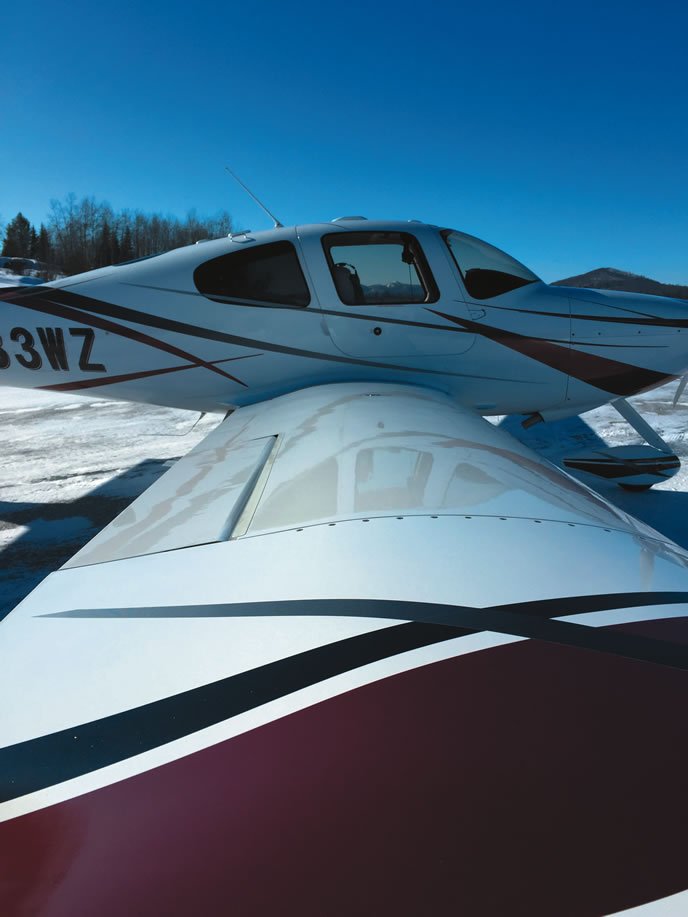
When proposals for a custom paint job on my second-generation Cirrus came in as high as $25,000—with up to 10 weeks of down time—I considered stepping up to a newer model. But my investment in numerous upgrades and my comfort with the aircraft in a variety of missions and weather convinced me to keep my ham and stop looking for rye bread.

Still, logic dictated that it was time to personalize and customize the paint work. Why? Because it didn’t need it. N233WZ has always been pampered inside and out and is stored in a heated hangar. However, it was born in a time where Cirrus’ ho-hum graphics make it look like every other G2 on the ramp.
I looked at aftermarket graphics, and while I wanted an aggressive design with custom colors, I never found what I was conceptualizing. That is until I saw some cutting-edge graphics and paint work on the Generation 5 Cirrus models. This clearly seemed like a radical change in appearances from the earlier models. Once I got pointed in the right direction, I decided to pull the trigger on an owner-assisted vinyl graphics project. Here is a firsthand account.

Design it once
The first step in this process was finding a company to design and provide the graphics. The company I chose to work with was Air Graphics from Fitchburg, Wisconsin. Air Graphics works with OEMs, including Cirrus, which was a plus. From my initial email to the delivery of the graphics, I was impressed with the customer service, design work, speed of renderings and the many samples that were sent to me overnight.
Air Graphics will move at the pace you set through the design process. The actual building of the vinyl material requires roughly two weeks. Air Graphics has three jumping-off points for the project: Semi-custom, Custom and the more basic process of reproducing the original design with custom colors.
Semi-custom designs can be rendered with your registration number in any color. A Semi-custom package means Air Graphics will change the color to your preference; however, the original design does not change. The price range for these predesigned renderings is $2200-$4400. The sizable price spread is due to the specific type of vinyl that is provided. The lower end of the price range is the plain, opaque materials. The cost becomes more expensive through the personal choice use of metallic and ultra-metallic vinyl, while the higher end of the price range is for textured vinyl, print-to-match colors and reflective films. An outline or gradient print added to any vinyl will make the graphic more expensive as well. Ultimately, the final cost is dependent upon the vinyl colors and design selected.
The Custom product requires a design fee of $495, which includes a minimum of three unique designs which are editable until you are satisfied with the final product. I dealt directly with Air Graphics designer Angel Adams. Most of the Custom design products average $3200-$3600, plus the $495 design fee.
Do it yourself, maybe
Like anything in life, experience is priceless. Jim Markey, my A&P, has it. I did the installation with him at his Certified Cirrus shop, Private Flight, at Sullivan County Airport in New York. The labor cost was about $1500 and the downtime was three days.
The FAA does not restrict who can do this project. You do not need a paint shop, there is no required sign-off and you won’t need to recalculate the aircraft weight and balance.
It is acceptable to apply the vinyl to control surfaces. However, only a few grams of weight are acceptable to add, plus movement and travel must not be affected. This is where the oversight of an A&P is invaluable.
I was clearly an Indian and not a chief on my project. My advice is to honestly assess your own abilities or the project might not go well. Of note, Air Graphics partners with a shop in Wisconsin that will perform the install at $100 per hour. One interesting point: If you have a Cirrus and want to refresh the exact original scheme, Air Graphics can’t do that. Duplicating the original must come directly from Cirrus.
The vinyl application process on my Cirrus took three days, with three people helping, three deliveries of Chinese food, three Crud Thugs (more on that in a minute) and a lot of on-the-fly planning.
First, the layout and inspection of the vinyl components. It is important to compare all of the pieces with master layout sheets that Air Graphics will include. Decide where to begin, based on overlap and how the design flows on the airframe. You’ll need a large working space that is both warm and dry.
Next is the most labor-intensive portion of the project—removing the factory graphics. A Crud Thug wheel is attached to a Snap-On Tools accessory mount on an air gun. The device is much like a wire wheel and if used incorrectly, can remove paint from the airframe.
Once the old graphics are removed, you’ll need to use a glue solvent to remove any glue residue that remains on the surface.
When the surface is clean of all glue residue, it’s time to polish the base paint. It is critical to remove oxidation and any ghosts left from the original decals. We used a 3M product that produced excellent results—the aircraft looked as if it just rolled out of a paint shop.
There is an important caveat here. The base paint on my aircraft was in excellent condition. My A&P had discussed this before I began the design of the graphics. If the paint was in questionable condition, we would not have started the project. This is perhaps the most important aspect of this project and a reason why a vinyl graphics project won’t be a fit-all solution.
The last critical step in the prep process is a final cleaning of the base paint. We used ethyl alcohol to remove all wax, oil and dirt from the existing finish.
Application of the new design starts with a dry masking tape application to check for actual fit. The vinyl is applied with a solution of water with 5 percent soap and 5 percent alcohol. This process requires extra hands and good coordination. As long as the vinyl is wet, it’s workable, but when it dries it becomes fixed, and there it stays. There is a learning curve here—see one, do one, teach one.
Once the vinyl has set for 24 hours, it’s time to make it pretty with microfiber cleaning and waxing. Carnauba wax works, but use caution not to use a cleaner-wax.
It’s said that vinyl graphics require little if any maintenance. Most cleaner, soap and wax that is safe for a paint is also safe for the vinyl.
There are widely conflicting opinions on the typical life of the vinyl material (that is, how long it will maintain its resilience before cracking, peeling and generally looking shabby.) Obviously, storage and climate is a huge factor, just as it is with paint. Its location on the airframe is also a factor, as described in the sidebar above.
So far, the vinyl seems to be nonreactive with the deicing fluid that spews from the leading edges.
Other options
Air Graphics isn’t the only source for vinyl graphics, but it does offer one of the most comprehensive design services and is we’ll regarded by many paint shops.
Still, there are other choices, including Aero Graphics in Loveland, Colorado. In addition to offering OEM replacement decals for exterior and interior use, it creates custom registration numbers, logos, military markings and custom striping in a variety of vinyl colors and for its StripeRite paint mask. Its graphics are popular in the Warbird community and are found on a variety of aircraft—from the Quick Silver P51D Mustang—to aircraft on display at popular museums.
Aero Graphics striping is provided in three layers, including a single sheet of wax paper. The top layer is a protective tape which is used during the application process, while the middle layer is the vinyl stripe decal.
Plane Vinyl in Kennesaw, Georgia, specializes in printed vinyl wrap using 3M products to create flying billboards, but can design custom schemes or work with your design.
Plane Vinyl’s Bud Newton stressed that the company is careful not to infringe on OEM trademarks and copyrighted designs. Instead, Newton told us his company can make custom changes to these designs for a fraction of the cost of the competition.
Newton also stressed the importance of applying vinyl graphics in a manner that doesn’t interfere with airworthiness. While he notes there aren’t official FAA regulations that address vinyl graphics (other than registration numbers), he always suggests that control surfaces are rebalanced (should any vinyl cover them) and the aircraft is weighed—no matter how minimum the job is.
“We follow the same regulatory guidelines that apply to aircraft painting, whether the aircraft is experimental or certified. While we know the vinyl is lightweight, it could change the characteristics of a control surface,” Newton said.
It’s worth noting that Plane Vinyl specializes and works with aircraft only. While it may contract with graphic installers around the country to do the work, it ensures that there is an experienced aviation technician overseeing the project. The key to a vinyl graphics is to know who is doing the application. While there may be installers skilled with working on motorcycles, trailers and boats, working with aircraft is another matter.
WRAP IT UP
My results with Air Graphics were impressive and I think the cost was modest in the world of aircraft refinishing. The takeaway is that it offered a cost-effective alternative to a custom paint job, with less.
Combined paint and graphics projects can create limitless results, but require a large budget and downtime.


