
Starlink has redefined global connectivity, delivering high-speed internet almost anywhere on Earth. Resourceful pilots found ways to adapt Starlink’s automotive-based service for aviation, and as word spread through forums and chat boards, Starlink took notice.
In late 2024, the company responded by imposing a speed cap that effectively restricted aircraft. To fill the gap, Starlink introduced a $250 per month plan with a 250- mph operational speed limit—far pricier than the original $50 per month option.
However, in March 2025, the company took a major step forward, revamping its plans to better serve the GA community and reintroducing more affordable options, bringing seamless inflight connectivity back within reach.
With all the hype surrounding Starlink, we decided to test the capability in a few aircraft, including a Cessna 310 and Beech Baron.
Flight ready?
There are multiple families of Starlink terminals. For our purposes, the two interesting kinds are the Starlink Mini and the Starlink Aviation terminals. The Mini, introduced in mid-2024, is about the size of a laptop (roughly 11.5 by 11.0 by 1.5 inches) and weighs about 2 pounds. While it’s weather-resistant, it is mostly intended for roaming usage and not a fixed install; Starlink’s website shows a hiker with one strapped to a backpack, for instance. The Starlink aviation hardware uses a conformal enclosure that mounts to the top of an aircraft fuselage, very similar to the ViaSat and Gogo antenna systems used on commercial airliners. In fact, Starlink is the inflight internet provider on JSX, and United Airlines, SAS, Qatar Airlines and other major carriers are converting to Starlink service throughout 2025. Both terminal types use phased-array elements to communicate with the satellites. There’s not much practical difference between the Mini and the residential terminals Starlink sells, other than their size; the residential units are larger, consume more power and can’t be conveniently mounted in aircraft. Starlink doesn’t warrant or support the residential units for in-motion use.
Purchasing the Starlink product was a fairly straightforward process, and we were only met with a few hiccups along the way, which were easily resolved by Starlink’s decent customer support. To order it, go to www.starlink.com, and in the top right corner of the page, select either the personal or business option. Ensure you’re on the Personal page (which should be the default). Click Order Now under the Roam tab, switch the device selection to Mini and select the Roam-50GB plan. The price will be $499 plus tax. This plan does not work for aviation. An upgrade to Local Priority or Global Priority is necessary, as these plans support speeds of 350 MPH and 550 MPH, respectively.
This is where things got tricky. While we successfully upgraded to the Local Priority 50GB plan, the change wouldn’t take effect until the next billing cycle. We attempted to contact customer support by phone, but system issues made them unavailable. Instead, we reached out through the Starlink app and requested an immediate plan change. After 72 hours, support called back and processed the change in seconds.
Starlink offers a Mini car adapter, essentially a power cable with a USB-C end and a cigarette lighter plug. It works with 12- and 24-volt systems and the specs say it has a maximum draw of 6.3 amps. We highly recommend purchasing this accessory for $45, plus tax. The website indicated a delivery window of around five days and the timing was spot on.
If you spend a few minutes on any Starlink forum, you’ll see all sorts of methods used to power it, including adapters that take DeWalt, Makita or Milwaukee power-tool batteries, large lithium-ion power banks like the Anker 737, plus USB-C power adapters. In our tests, the Starlink Mini terminal was happy to run from an Anker 737 or 28-volt ship’s power (via a Baseus cigar-plug adapter). There have been forum reports that USB-C power sources must provide at least 100 watts of current to let the Starlink boot; in our use, we didn’t ever see more than about 25 watts of power draw. Starlink says that the Mini draws 20 to 40 watts, on average, with 15 watts at idle. In one test we ran the Mini for an entire flight from Huntsville to Dallas (a little over three hours) off a single charge of the Anker 737 with no difficulty. If you use a power bank, make sure it has an AC plug, as we had issues with a 100-watt USB-C power bank failing to work properly with the Starlink terminal. We purchased a 38,000 mAh power bank, which lasted around five hours using the AC plug.
Setup and mounting
You’ll need the Starlink app for either iOS or Android to set up your account. You can do this before or after purchasing your terminal. Setup is simple; once you have the hardware in hand and powered up, you’ll log into your account on the app, then join the terminal’s published Wi-Fi network and continue the setup by orienting it until it gets lock on a passing satellite train. This may take 10 or 15 minutes, and you may also be offered one or more firmware updates for the unit itself. It’s super easy to do this, although you should bear in mind that the terminal needs a clear view of the overhead sky, so it’ll probably need to be outside (or at least close to a window) to get an initial lock. During orientation you’ll see a screen on the app for using your finger to reorient the image to give you a 2D projection of the 3D airspace above the terminal; this will help you pinpoint what orientation and elevation the antenna prefers. You may need that in flight—more on that in a minute.
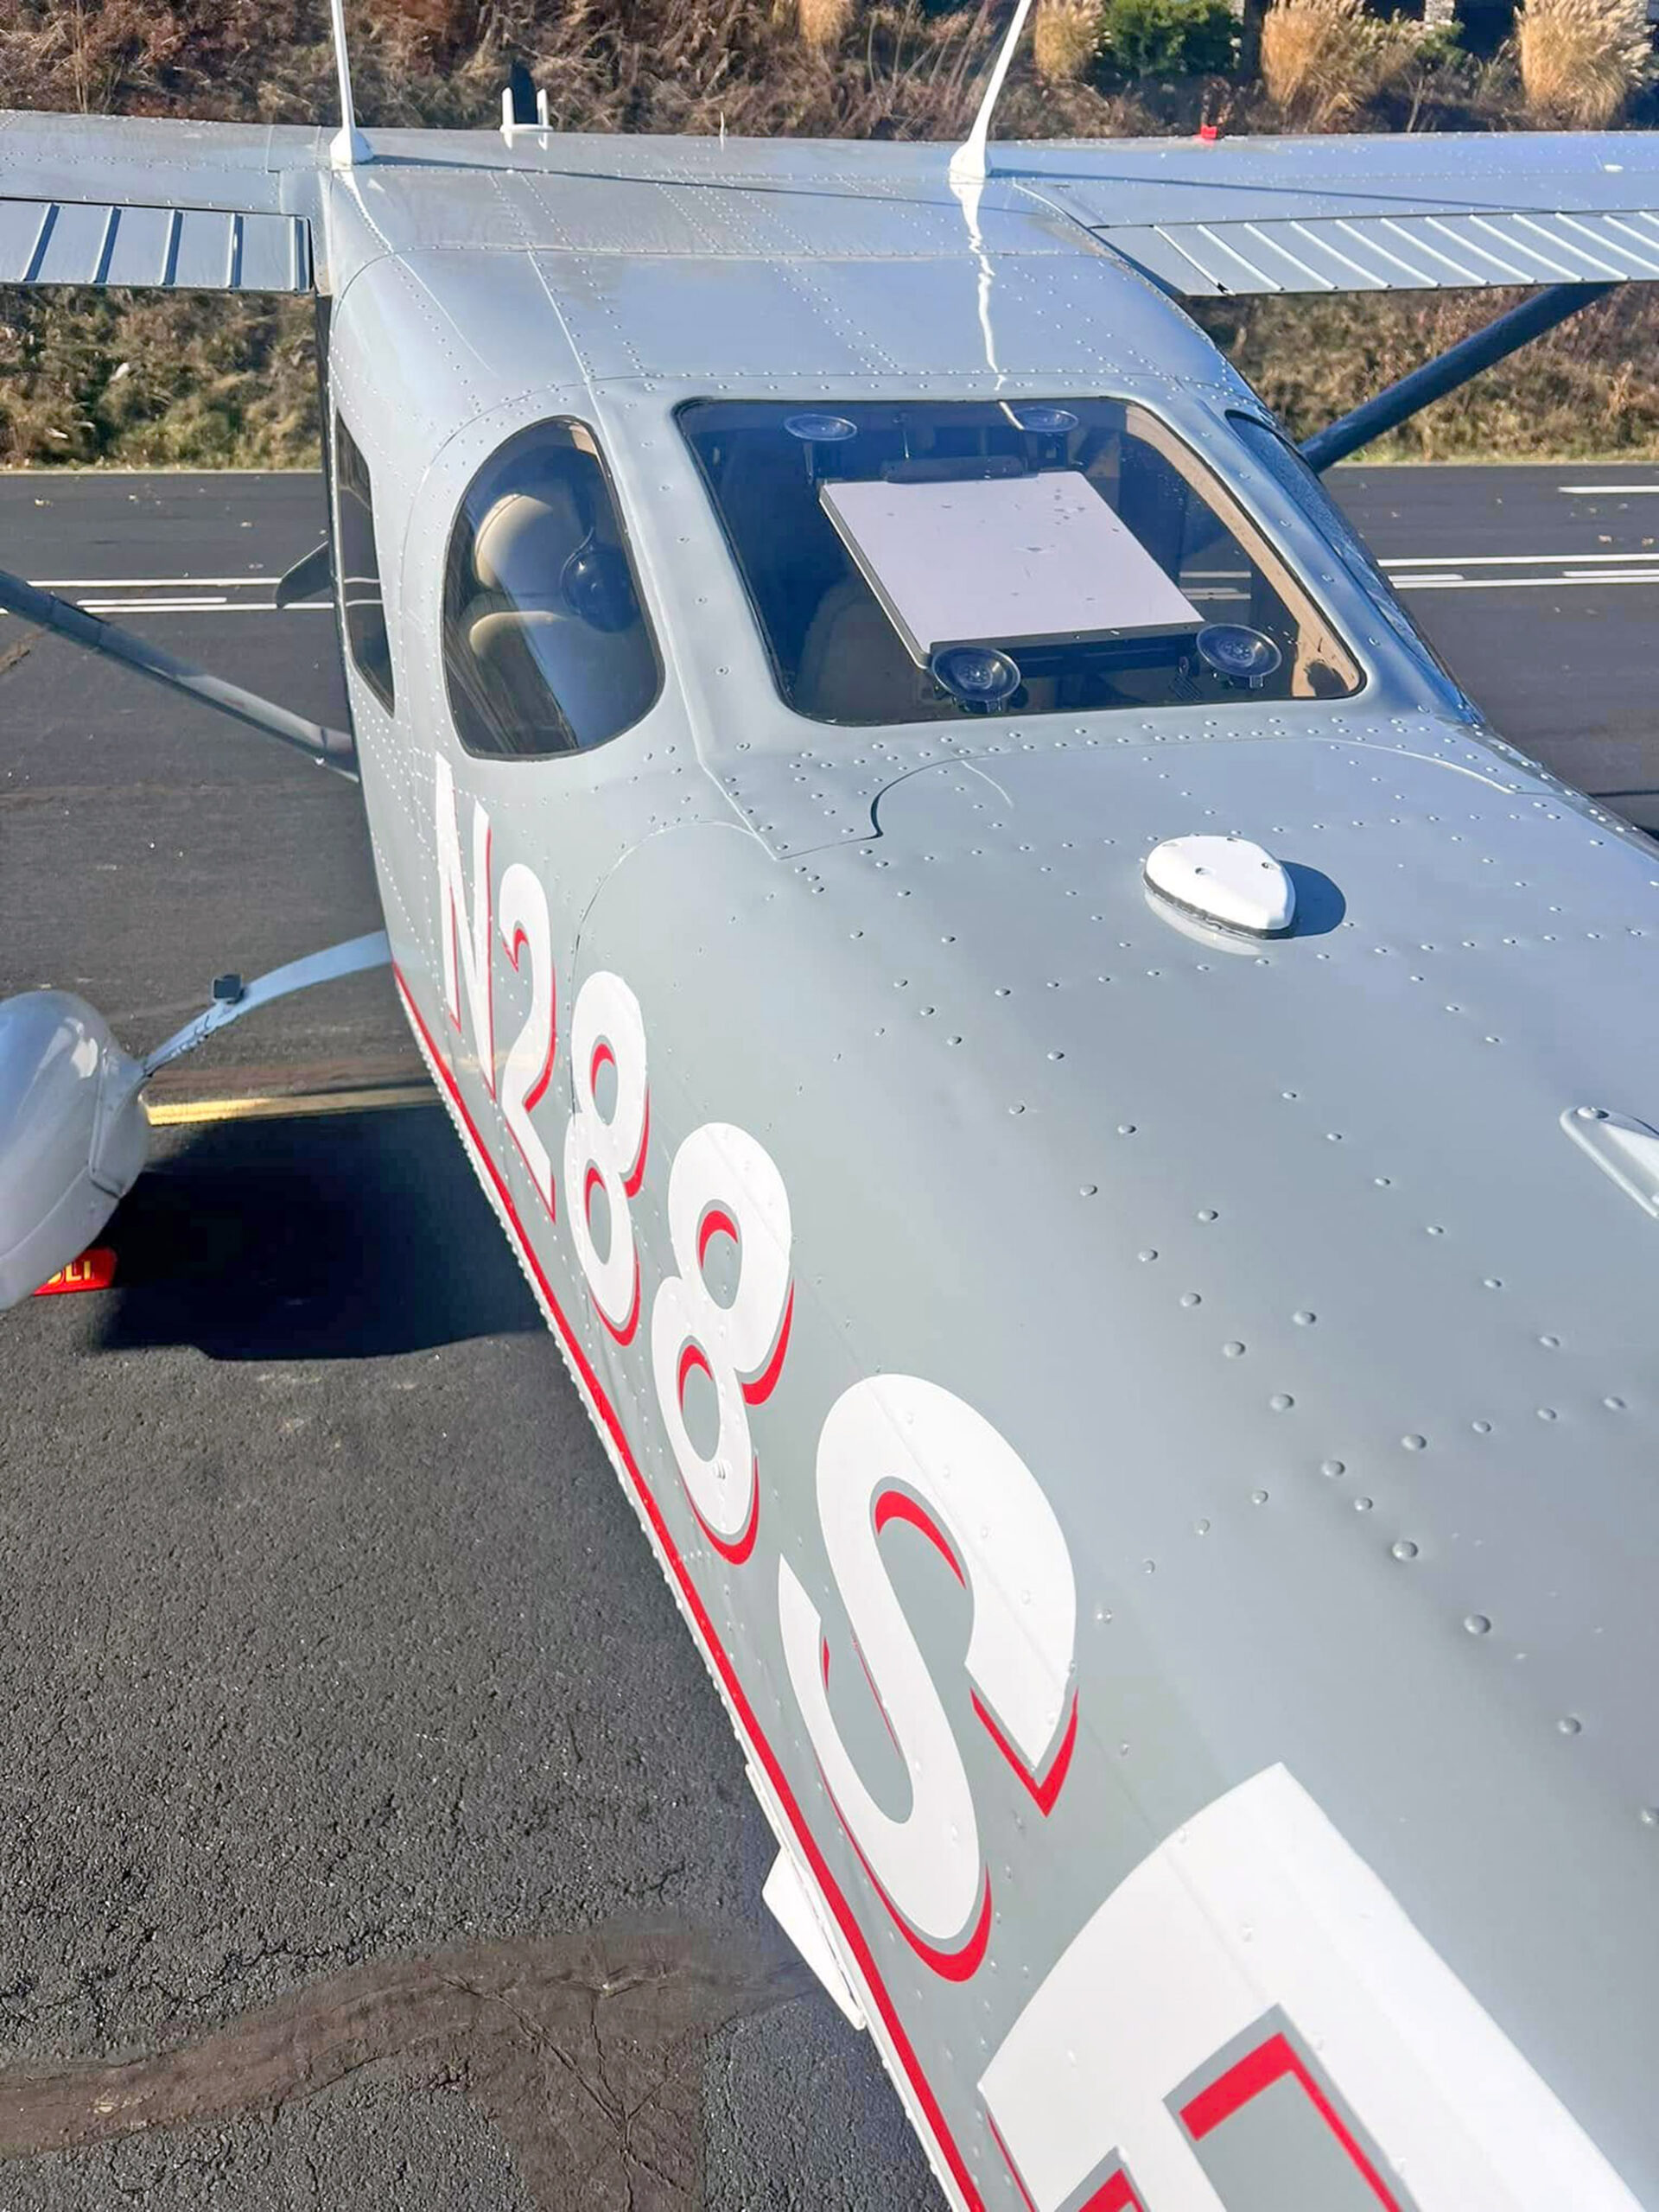
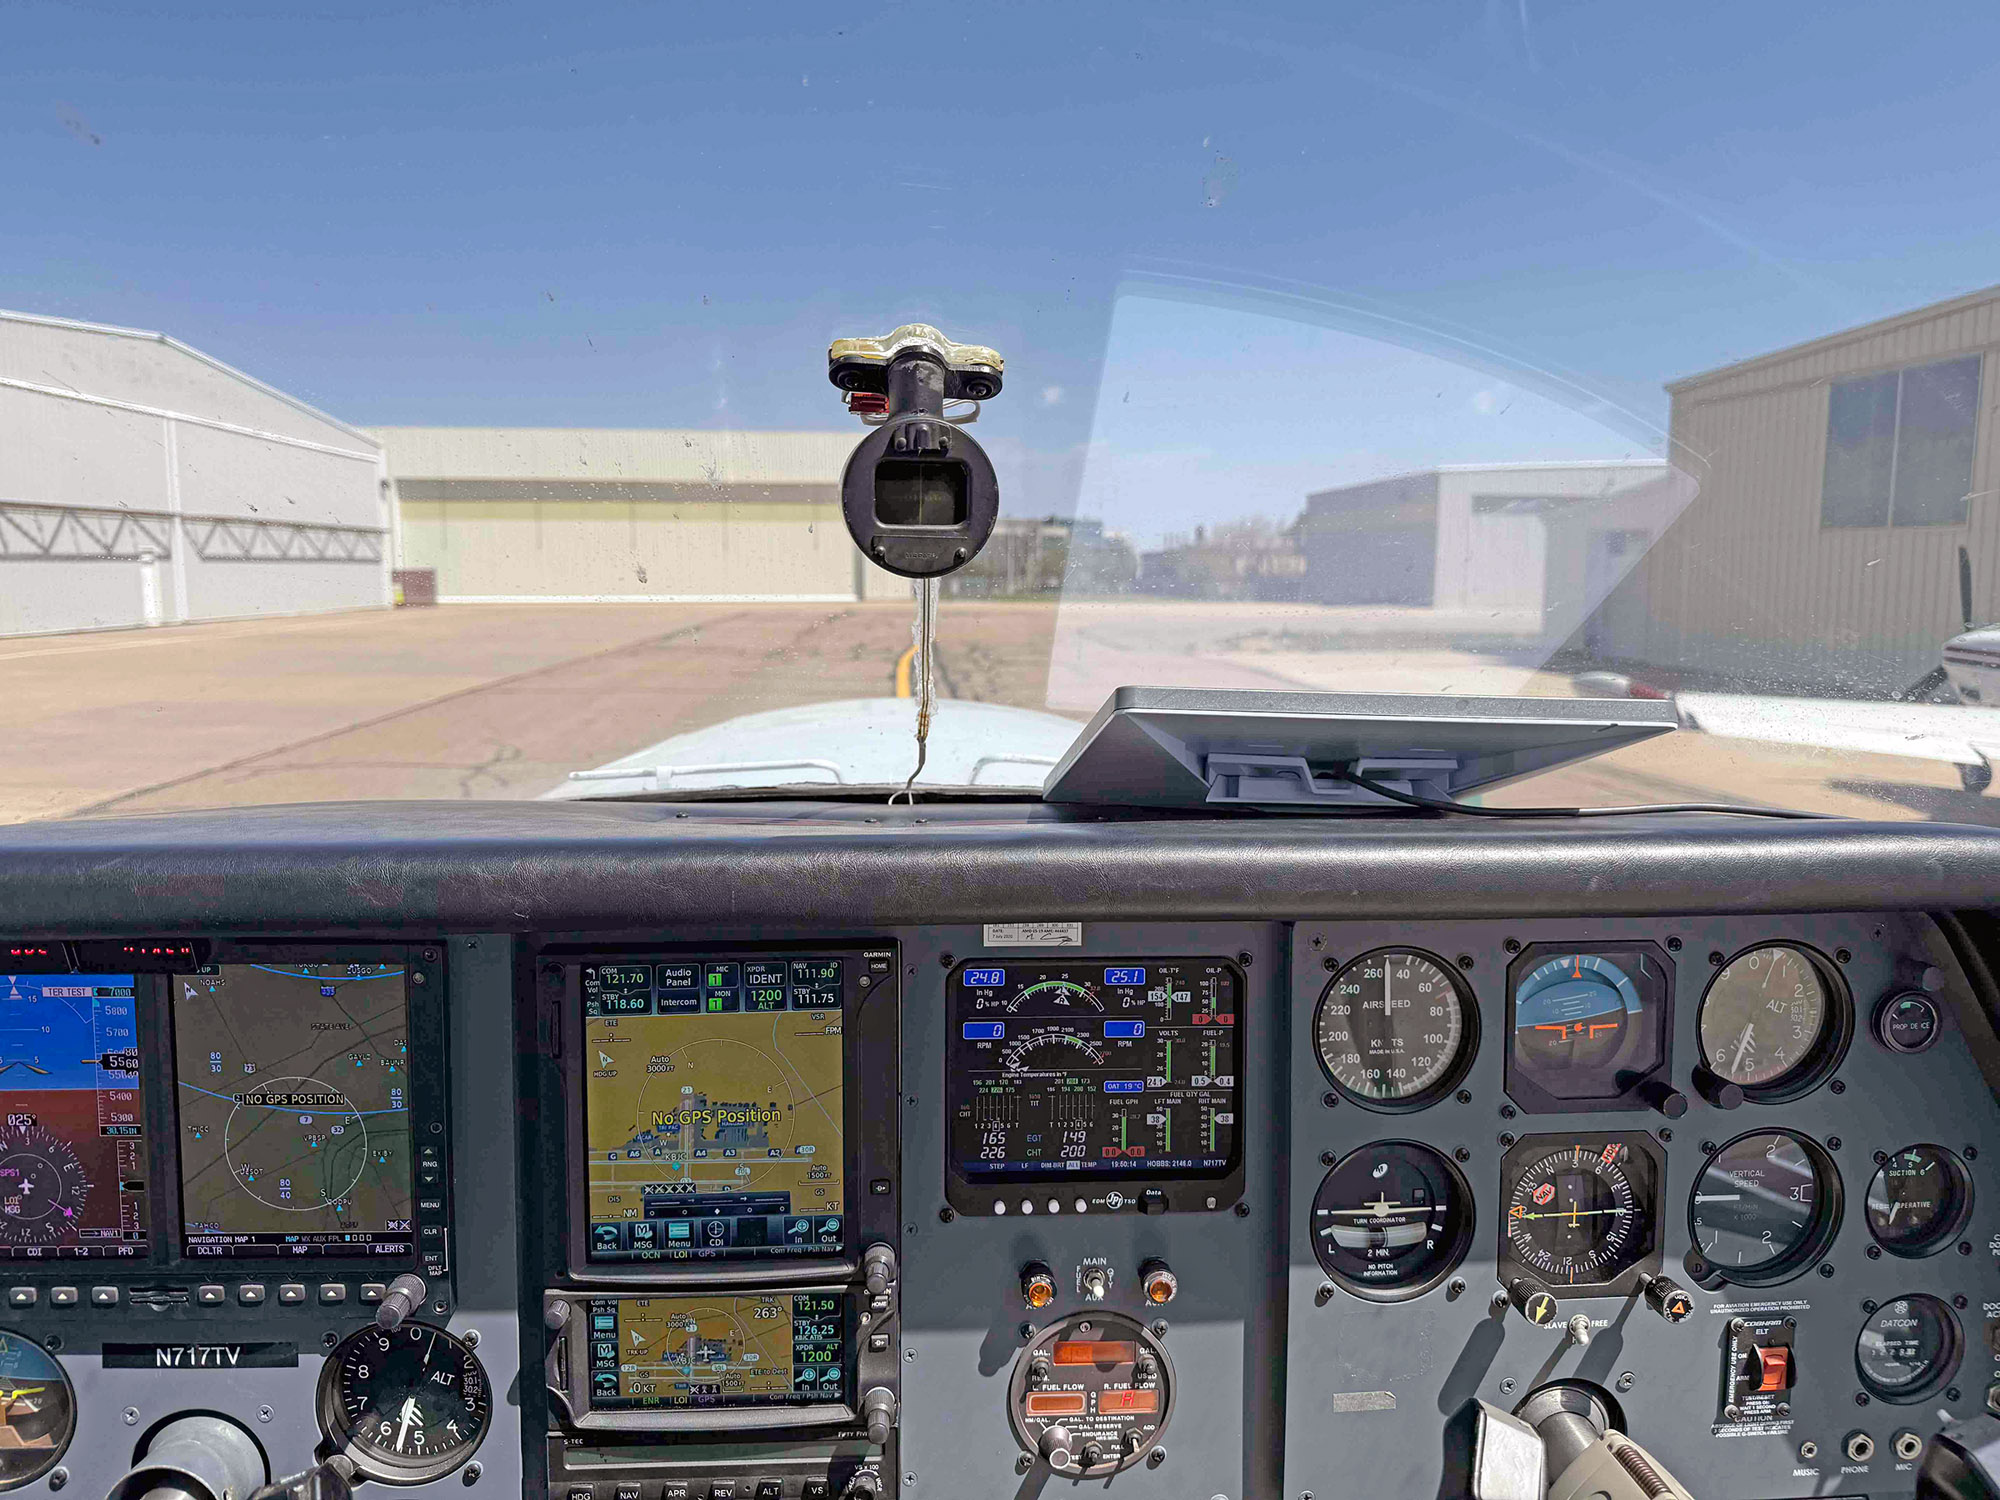
Since Starlink connects to low-Earth orbit satellites, the device must have a clear view of the sky. If your aircraft has a rear window or canopy, installation should be simple and many pilots use suction-cup mounts (from Amazon) to secure the device to the glass. Plopping it on top of the glareshield is common, too, but it’s unsightly and can become a projectile in a crash. Consider stowing it during takeoff, landing and in turbulence.
The Mini terminal has a small plastic “kickstand” that snaps into the back of the unit, which can accommodate a 1.5-inch pipe. We’ve seen one owner mount a small section of PVC pipe in a plastic storage container and clamp the terminal to the container so it faces the side window in a Cessna 182. Another 182 owner used the back window in his airplane with suction-cup mounts.
So far, we’ve tried several different mounts (two from Amazon and one from Etsy) for the side window of a Baron. The window curves top-to-bottom and front-to-back, so none of the mounts have worked well.
In flight
It couldn’t be easier to use the service in flight: Power up the terminal, give it a minute to connect and then you and your passengers can connect to the terminal’s built-in Wi-Fi router. As soon as the terminal gets a signal lock on the beam, you’ll have access to the service. This is very similar to how GPS signal acquisition works, for the same reasons. As with GPS lock, you can lose lock if the orientation of the terminal changes in a way that prevents the terminal from seeing the correct part of the sky. For example, if you’re headed due east, and your terminal is on the glareshield, a turn to due north may cause you to lose some, or all, of the beam footprint you’re in, resulting either in slower performance or a loss of signal. The fastest way to fix this is to bring up the orientation page in the Starlink app and reorient the terminal until you get a good lock again. For most of us, flying predictable routes in the en route environment won’t pose any real problem.
How’s the quality? It’s quite good. You can easily stream video and audio—even with multiple users—without any problem. The few test FaceTime calls we’ve made performed well. We typically saw speeds from 55 Mbps up to a high of 122 Mbps. The antenna orientation matters, as does the direction of flight. The Orientation tab in the Starlink app will give you a real-time graphic view with cues showing you how to rotate and elevate the antenna for best signal strength. This is challenging to do in the plane so you should plan for periods of lower speed (and possible disconnections) depending on your heading and the antenna orientation. The app also contains a built-in speed test that gives you an instantaneous upload/download speed meter. There’s also a handy “statistics” view that shows latency, throughput and power consumption data.
The test bed Baron is equipped with Avidyne GPS units that include Wi-Fi, plus a Garmin GTX 345 ADS-B transponder. The Avidyne units stream ADS-B and FIS-B over the Wi-Fi connection and the GTX 345 provides the same data over Bluetooth. In this Baron, we use the ForeFlight and Avidyne IFD100 apps on an iPad connected to the Avidyne Wi-Fi. If we wanted to connect the iPad to the Starlink connection, we have to switch it to that network, which means not using the IFD100 app. It’s supposed to be possible to create a wireless network using the Starlink as the access point, then joining the Avidyne units to it so that any device in the plane can use both the Internet and the ADS-B data stream, but I didn’t set it up that way because doing so means you have to reconfigure the network if the Starlink is turned off or on the ground.
New plans
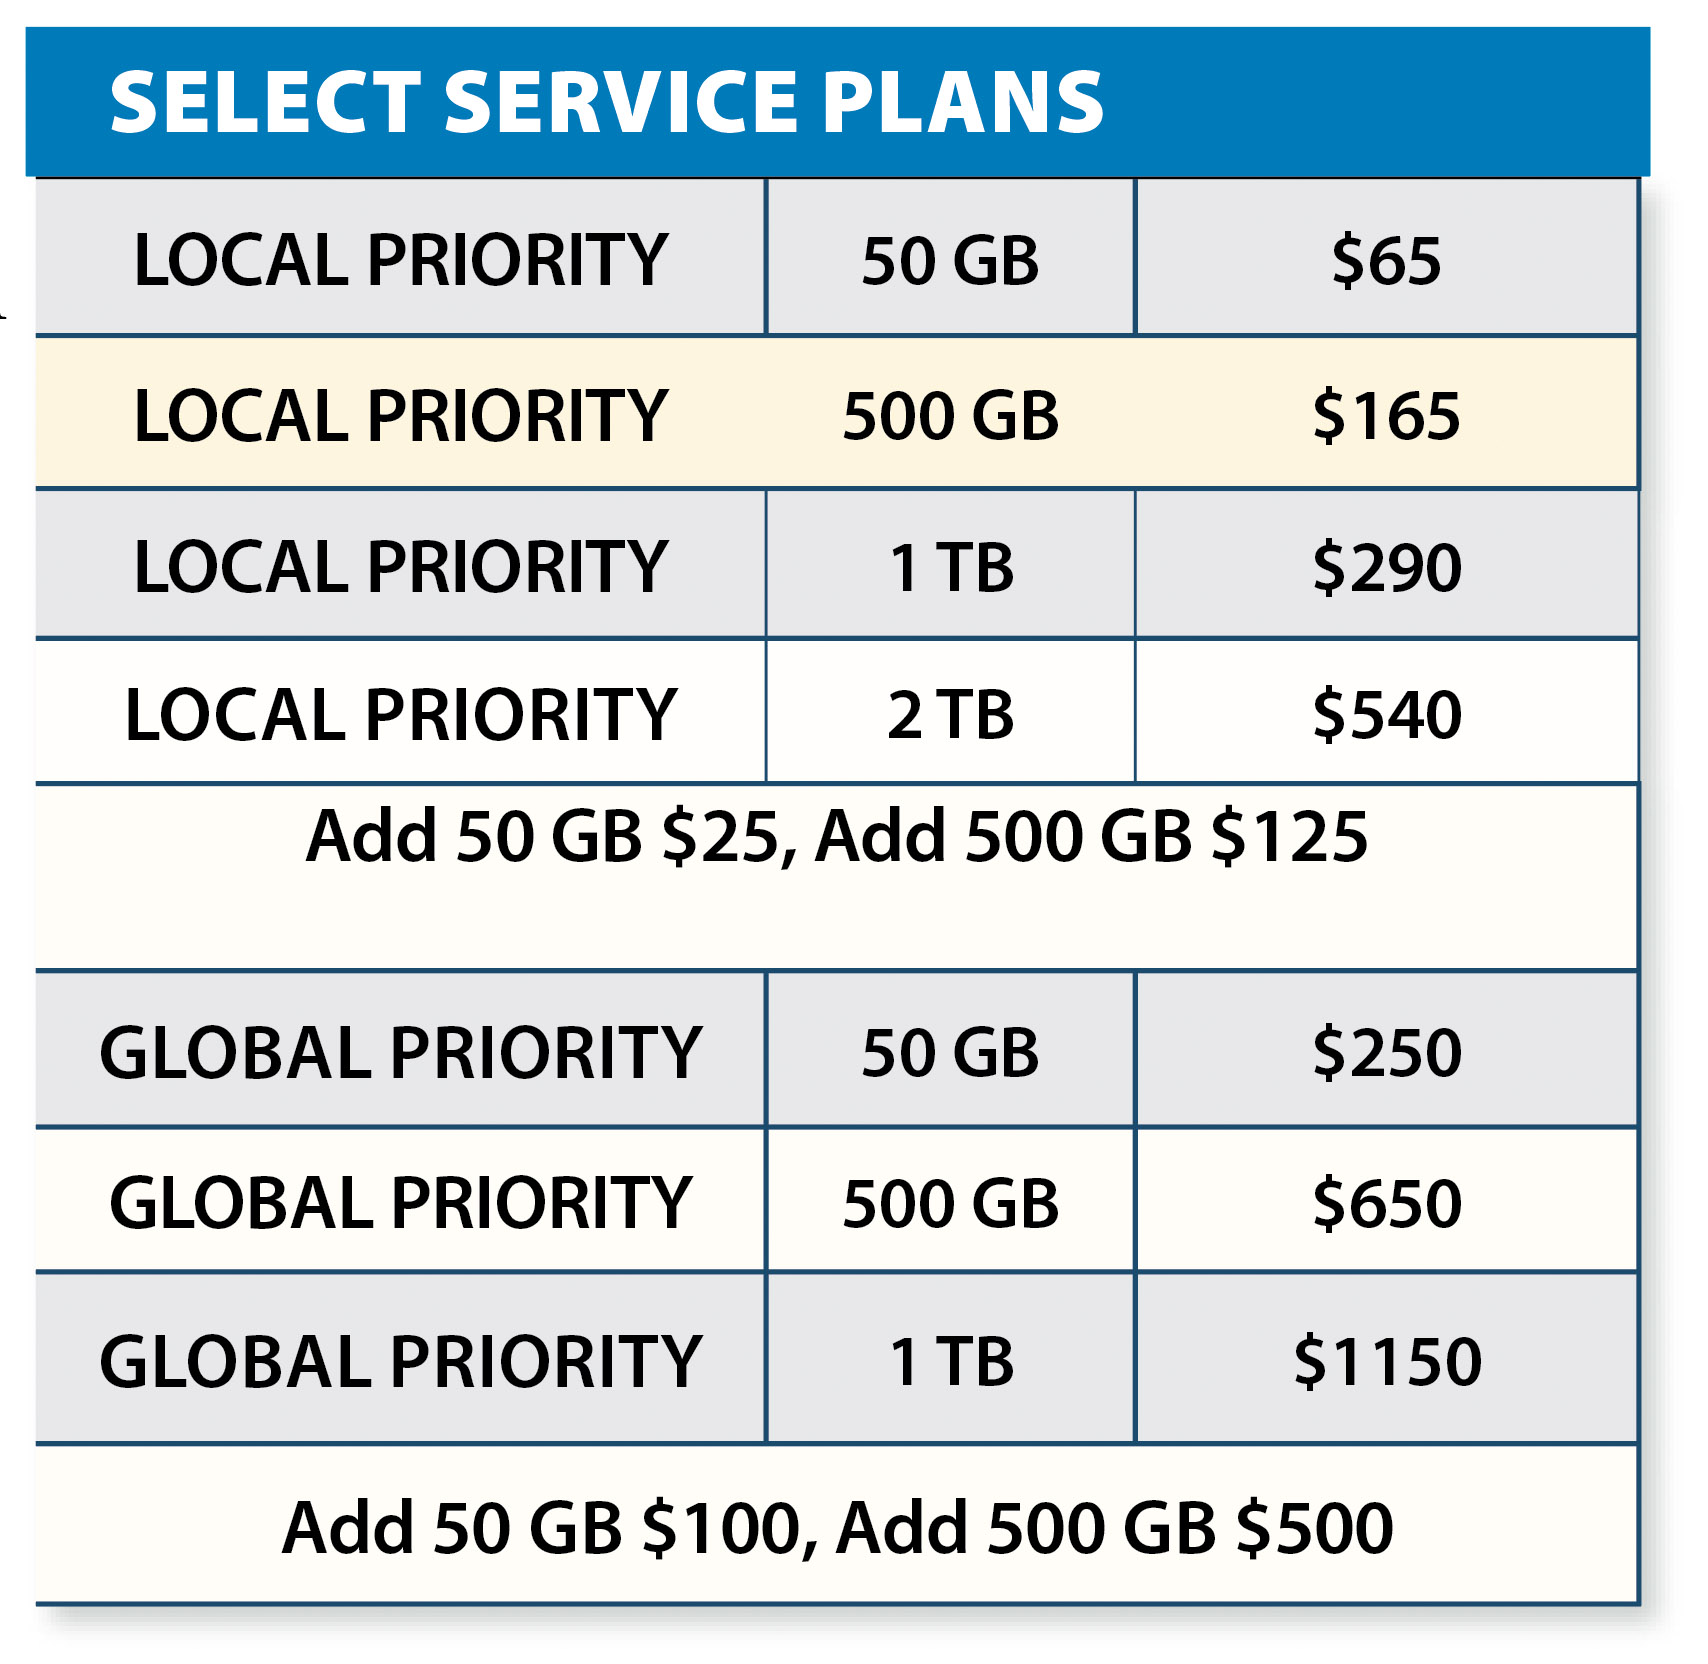 Initially, the $50 per month roaming plan would work at groundspeeds less than 200 knots. Starlink changed the term of their plans so that you needed the Mobile Priority plan, which costs $250 per month for groundspeeds under 250 knots. Starlink changed the plans again (see the chart at the right) to offer two categories of Priority plans. Local Priority plans only work in whatever country your subscription says you live in; Global Priority plans work anywhere that Starlink is allowed to offer coverage. Apart from the region restriction, the two most important differences are that Local plans don’t work in territorial waters, and that the maximum speeds differ (350 mph max for Local Priority, 550 mph max for Global Priority).
Each plan allows you to buy blocks of data in either 50-GB or 500-GB increments. You have to buy at least one block along with whatever plan you choose; if you run out of data, your connection speed will drop drastically unless you buy another block.
If you overspeed your plan, after about five minutes the Starlink app will pop up a message telling you that you’re going too fast and your connection will be dropped. While it’s possible to reboot the Starlink and get another few minutes of connectivity, it’s not conducive to high passenger satisfaction.
Not for every mission
In the Baron, the next thing to test is mounting the Starlink terminal on the radar shelf. The plane has a Norton/Saint-Gobain radome, which is more microwave transparent than the factory radome, so it might offer slightly better signal quality while keeping the antenna tucked away. The plan is also to add power and a control switch on the avionics panel instead of having to use the cigar lighter.
We didn’t think the original $250 per-month cost made sense for the majority of general aviation missions, but now that Starlink has cut the monthly cost to as low as $65 (for the basic plan with a single block of data), it’s easy to see this as a compelling upgrade.
Having in-flight availability of more varied weather data alone could justify the cost for many pilots, not to mention the passenger-friendly utility of in-flight connectivity. Assuming Starlink doesn’t significantly change the price or service quality, we believe the good performing Starlink Mini is a winning investment for most cross-country GA aircraft.
Sy Pinkert contributed to this report.